|
FEATURE
Using Raspberry Pis to Enhance Your Library
by
Daniel Davis
| The humble Raspberry Pi is a common makerspace resource that is often overlooked and regarded as just a teaching tool. |
Makerlabs and makerspaces are amazing components of the maker movement. They are places in which anyone can go to innovate, create, collaborate, and learn through making. For those who aren’t aware, the maker movement, or DIY culture, is a shift from being a consumer of things to a creator of things. Makerspaces promote the maker movement by offering a DIY-focused community and providing the tools and resources to create anything you can imagine.
While library makerspaces are often used for patron programs and classes, the tools and resources they offer can stretch beyond the space itself. 3D printers and laser cutters have obvious applications outside of the makerspace, but the humble Raspberry Pi is a common makerspace resource that is often overlooked and regarded as just a teaching tool. AI, machine learning, robotics, blockchain, virtual machines, and computer vision are just a few of the technologies that can be implemented with a Raspberry Pi. They are incredible little devices that can turn almost any idea into a reality. We’ve been using them within our library to help enhance our infrastructure and patron services, and I would like to share that experience with you.
History of the Pi
But before we jump too far down this rabbit hole, let me explain what a Raspberry Pi is. In 2008, at the University of Cambridge, developers sought to make a small, extremely affordable computer to help generate interest in programming and computer sciences. Led by Broadcom chip designer Eben Upton, the goal was to create a computer that was open to both tinkerers and serious developers while keeping it as inexpensive as possible. Co-creator Pete Lomas is paraphrased as describing it this way: “a machine that offered a window into how computers work—not to ship a tightly shut black box, but instead a bare board where kids could learn each component, could feel the processor getting hot as it worked, and delve into the code for the open-source software running on the board” (techrepublic.com/article/inside-the-raspberry-pi-the-story-of-the-35-computer-that-changed-the-world).
The fruits (pun intended) of those efforts led to the release of the $35, credit-card-sized Raspberry Pi in 2012.True to its word, the Raspberry Pi provided makers and tinkerers with a small, cheap, simplistic computing platform for learning about computing, electronics, and coding. It instantly became a phenomenon among the maker community. Its versatility allowed it to be used in a variety of different ways, from teaching basic computing to full-on robotics platforms. It basically has become the Swiss Army knife of computing and electronics.
Benefits
Do you see its potential yet? If not, here’s a list of some of the elements that make the Raspberry Pi more prominent and ubiquitous than its competitors: price, size, power consumption, integration, and community. Let’s take a closer look at what makes these elements so special.
Price —For the most part, the 2012 introductory price of $35 has not changed. What has changed is the number of different kinds of Pi’s that are available. The smallest model, the Raspberry Pi Zero, comes in at around $10–$15. The most popular model, the Raspberry Pi 3 B+, is still $35, and the most powerful model, the Raspberry Pi 4 B+, ranges from $35 to $75. So, even the most powerful Pi is still under $100.
Size —I’ve already mentioned that the compact size was an intentional design choice from the beginning. The original Raspberry Pi Model B and every subsequent B model are approximately the size of a deck of cards and don’t really vary from that with each new release. If you need something even smaller, the Raspberry Pi Zero series is slightly larger than a stick of gum. Its small footprint provides portability, making it easy to integrate it into other projects without sacrificing space.
Power consumption —Aside from the Raspberry Pi 4 B+ series, all other Raspberry Pi’s run off of only 5V of power. That’s the same amount that most cellphones require to charge. In fact, Raspberry Pi’s can be run off of phone-charging battery banks, making Pi’s truly portable. Not to mention, when more and more libraries strive to be environmentally friendly, swapping out power-hungry desktops and laptops with 5V Raspberry Pi’s is a great way to save on energy.
Integration —Not only does the Raspberry Pi’s size make it great for integrating into other projects, but it’s general purpose input/output (GPIO) pins make it easy to control these projects. GPIO pins were one of the most revolutionary additions in the design of the Raspberry Pi. They allow for the Pi to control and receive input from just about anything that can carry a current: buttons, switches, LEDs, LCDs, speakers, and sensors, just to name a few. With its Wi-Fi and Bluetooth capabilities, adding a Raspberry Pi to existing electronics basically turns it into an Internet of Things (IoT) device.
Community —Probably the most appealing part of using a Raspberry Pi is its support community. That’s what differentiates it from any other DIY computer out there. There are many different online and offline communities that will enthusiastically help you answer any questions you may have. Don’t want to rely on community support? Well, depending on your project, paid support may be an option too.
Drawbacks
While there are many perks to using a Raspberry Pi, the reality is that there are some drawbacks as well. So, if you are serious about using them in your projects, the disadvantages would be good to know as well.
DIY —The Raspberry Pi is not designed to be a bare-bones computer platform that allows you to create whatever you want from it. However, that means you will have to be comfortable creating things yourself. This might require learning a bit about basic coding, basic electronics, and basic computing. If you were expecting something that’s plug-and-play, then the Raspberry Pi may not be for you.
Linux OS —Instead of the Windows or Mac OS that most people are familiar with, the Raspberry Pi runs a free OS called Linux. Linux can often look and act like the Windows or Mac OSs. However, it can also be completely different when it comes to usage and is not compatible with a lot of programs that run on Windows and Mac OS.
Processor —The Raspberry Pi uses an ARM processor. This is important because Windows computers often use x86 processors. Due to this difference, programs that run on Windows computers may not run on the Raspberry Pi.
Network security —Anything that connects to a network can be a potential security risk. The Raspberry Pi can sometimes be considered an IoT device, so it’s important to check with your networking department before adding a bunch of Raspberry Pi’s to your network to ensure they’re properly secured.
Required Bits and Pieces
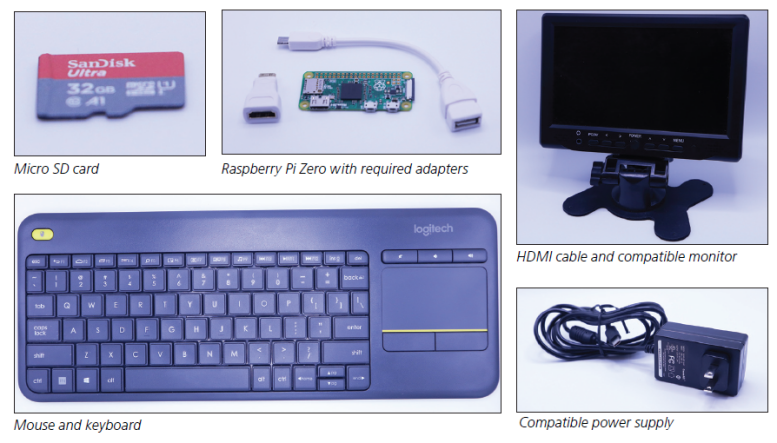
Aside from the Raspberry Pi itself, there are a few other parts and pieces required when you use it for the first time. Often, you can buy Raspberry Pi kits that contain everything you need to get started (minus the keyboard, mouse, and monitor).
Micro SD card —The SD card holds the OS and acts as a hard drive.
Power supply —Aside from the Raspberry Pi 4, which uses USB-C, all previous versions of the Pi use a micro USB cable. Both types of cable are often used to charge smartphones, so if you have a matching cable for your smartphone, you can also use it to power your Raspberry Pi.
Keyboard and mouse keyboard —These are often commonly available in libraries and may not need to be purchased separately.
HDMI cable and monitor —A lot of older computer monitors don’t have HDMI input, so just make sure the monitor you are using has an HDMI connection.
Adapters —The Raspberry Pi Zero needs an extra HDMI and USB adapter to be able to connect everything. The Raspberry Pi 4 B+ has micro HDMI ports, so those will require adapters or compatible cables as well. Again, look for Raspberry Pi kits that contain all of the adapters and parts needed to get started.
Separate computer —A separate computer is required to download and install the Raspberry Pi OS onto the micro SD card. That being the case, a micro SD card reader is also needed for the separate computer.
USB printer —A printer is only required for the following project and not to set up the Pi in general. In my example, I will be using a receipt printer.
Setup, Step-by-Step
To show you the setup, I’ll be using this basic project to give you a taste of what a Raspberry Pi project is like. This procedure will basically turn a Raspberry Pi into a print server.
The first thing that needs to be done with a new Raspberry Pi is to install the Raspberry Pi OS. On a separate computer, download and install the Raspberry Pi Imager (raspberrypi.com/software). After inserting the micro SD card into your computer, run the Raspberry Pi Imager. Click Select OS, and choose Raspberry Pi OS 32bit.
After selecting your OS, and with your micro SD card inserted, you can click the Choose Storage button. Select your micro SD card from the list. Finally, click the Write button. This will copy the Raspberry Pi OS files to your micro SD card. When the process is done, you can eject the micro SD card and insert it into your Raspberry Pi.
Before plugging in the power, you will need to connect a keyboard, mouse, and HDMI monitor to the Raspberry Pi. Ensuring that the micro SD card is still inserted into the Pi, plug in the power cable and let the Pi boot up. After a few seconds, you should see the Raspberry Pi OS First Run Wizard. After completing the wizard, the Pi will reboot, and you’ll see the Raspberry Pi OS desktop.
At this point, you can plug your printer of choice into the Raspberry Pi. Then use your mouse and keyboard to click on the Raspberry Pi menu in the upper left of the screen and select Preferences then Print Settings. This opens the Raspberry Pi print manager, and we can click Add to add a new printer.
Select your device from the left-hand menu. If your printer isn’t recognized, it will show up as Unknown. If you are unsure which one is yours, select each printer until you find one that has a description of “A printer connected to a USB port.” Then click Forward.
The next step is to select your printer driver. If you are lucky, your printer and model will already be listed and ready for you to select. If you are not so lucky, you will need to download the Linux drivers for your printer and try again. I was not so lucky and had to install my receipt printer drivers from the adafruit library on Github (github.com/adafruit/zj-58).
Once the printer drivers are sorted out, fill out the printer description fields and click Apply. You’re welcome to print a test page to see if everything works. To share the printer, click on Server from the menu and select Settings. Check the box for Publish Shared Printers. If you plan to remove the mouse, keyboard, and monitor from the Pi, you could check Allow Remote Administration to allow for configuration over the network (it can be accessed via https://your_pi_ip_address:631/admin).
Finally, on a Windows computer, click on the Windows menu and search for Printers to open up the Printers & Scanners app. Click Add a Printer or Scanner, and it will search the network for available shared printers, one of which should be your Raspberry Pi printer. Just add it as a printer and test it out. Now you have a Raspberry Pi-hosted print server.
Practical Library Applications
Now that we’ve gotten a taste of Raspberry Pi (pun intended again), let’s take a look at some of the ways in which my colleagues and I have used it to enhance our library.
Catalog computers —Within our library system, we were using Windows desktops at our locations to run our catalog computers. The only purpose of those desktops was to show a browser to point to our website. It was such a waste of space and energy for such a simple task. So, we replaced them all with $55 Raspberry Pi’s running a locked-down Chrome Kiosk application and nothing else. No desktops, no background applications, just Chrome. (You can find the info in the Resources list.) Another benefit is that the Pi can attach to the back of the monitor, basically turning the monitor into an all-in-one.
Network proxy/web filter —Along with our catalog computers, to prevent people from navigating to websites they shouldn’t, we also created a network proxy with a Raspberry Pi running the Pi-hole application (pi-hole.net), which just whitelists our approved websites. Definitely run it by your networking department before putting a proxy on your network, as the department may already have a solution in place.
Digital signage —A lot of libraries use digital signage to display information about events and programs going on within the system, most of which is driven by mini PCs. This is something else we ended up replacing with Raspberry Pi’s. There are many different options you can use, such as a basic DIY slideshow (binaryemotions.com/digital-signage-systems/raspberry-digital-signage) and a cloud-hosted third-party vendor with paid support (pisignage.com). The awesome thing is that, depending on your model of Raspberry Pi, it can often be powered from a USB port on the TV.
3D printer controller —A great use for the Raspberry Pi is taking tech that doesn’t have online access and putting it online with a Pi, like the print server project I just discussed. Another practical application is controlling one of our 3D printers. 3D printers are normally controlled by a computer via USB, but, instead, I can just plug the USB cable into the Pi and control it from the network. There is great software called OctoPi (octoprint.org/download), which allows you to control and submit prints to the 3D printer from the network. And the Pi also supports webcams, so the prints can also be remotely monitored and viewed through OctoPi.
Interactive exhibits —Using Raspberry Pi’s for interactive setups is where they excel like no other. The sky is the limit when it comes to making ideas a reality. For a photo festival our library participated in, I created a photo booth that prints snapshots to a receipt printer. It was such a massive hit that it’s now a permanent exhibit at our library. I made it with a Raspberry Pi, the Raspberry Pi webcam, a 7" display, and a large push button. The case was fabricated using the equipment found in our makerlab.
The next example, which is still a work in progress, is an arcade cabinet that runs completely off of a Pi Zero running Microsoft’s MakeCode (arcade.makecode.com/hardware/raspberry-pi). The intent is to have classes teaching game creation with MakeCode, and then the games can be loaded on the arcade cabinet and played.
Potential Applications
There are so many potential practical uses of Raspberry Pi’s to enhance a library. Here are a few that we haven’t implemented within our system but are great for inspiration.
Book digitizer —Another terrific thing about the Raspberry Pi is its ability to do computer vision. This allows you to programmatically analyze what the Pi sees through a webcam. The computer vision software is called OpenCV, and one application for it is OCR. So, in real time, you could use the Raspberry Pi webcam to view pages and extract the text. You could save it to a file or use a text-to-speech engine to read the text to you—essentially making a book-reading bot (instructables.com/BrickPi-Bookreader-Digitize-Books-With-Mindstorms-).
Public print management —Another great use for a Pi is to manage public printing. There is software available called PaperCut (papercut.com/tour/raspberry-pi), which turns the Pi into a print release station that can be integrated with lots of different ILS platforms. You’ll just have to check compatibility on the PaperCut website.
Door counter/people counter —Because of its GPIO pins, the Raspberry Pi is great at collecting data from sensors. Connecting a simple motion-detecting sensor to the Pi will allow for a super cheap way to count people (instructables.com/How-to-build-a-People-Counter-with-Raspberry-Pi-an). Alternatively, going back to computer vision, you could also use a Raspberry Pi camera and count how many people the camera sees (pyimagesearch.com/2018/08/13/opencv-people-counter).
Thin clients —One goal I have for our library is to replace our public computing desktops with Raspberry Pi’s. This can be done using Raspberry Pi’s as thin clients that connect to a virtual computer. The virtual computer would host Windows instances, and the Raspberry Pi’s would connect to those instances, allowing for the public to use them (winterminal.com).
Final Thoughts
Hopefully, this article has shown you not only all of the things a Raspberry Pi is capable of, but also that it can be a key component to making your ideas reality. That’s why the maker movement is so inspiring: You have the ability to dream something up and then use makerspace tools to create it. Don’t be afraid to experiment, and don’t be afraid to make mistakes. It’s part of the process, and it’s part of the maker journey. Who knows, your next idea may be the next big thing that libraries can’t do without!
|


 pins that allow you to connect and control other electronics.")
 Daniel Davis (