FEATURE
Around Your Library in 90 Seconds
by Joe Marciniak
| Even if you regularly give well-attended library tours, it doesnt hurt to have a virtual option. |

Scenario: Your library is amazing, and you want to give everyone a 2-hour tour.
Problem: No one wants a 2-hour tour.
Solution: Create an informative virtual tour that showcases your incredible library.
I work in a 45,000-square-foot academic library. It spans three floors and is packed with diverse spaces and technologies. A focused tour can take 30 minutes, and although most visitors enjoy the tour, those who need it the most are the least likely to participate: new students. So I decided to create a virtual tour (VT) that would be brief, informative, and engaging. I wanted students to be able to learn about the library on their own time and online. Here’s how you can do it.
Getting Started
Divide your project into three sections: preproduction, production, and postproduction (earth-shattering, I know). But each section is important and builds on the previous one. If you move too fast, you will likely make mistakes and create more work for yourself later in the process. Preproduction includes brainstorming, drafting scripts, and a complete visualization of the project; production involves using equipment to actually create the multimedia content; and postproduction includes editing, special effects, music, and preparing for future changes.
Preproduction: What to Do Before Pressing ‘Record’
Scripting —Write the script first. Sit down with the rest of the library staffers and discuss which items, locations, and services should be included in the VT. Remember that the purpose of the video is not library instruction. At some point during the meeting, you will likely have to ask the reference librarian to leave because he or she will keep suggesting that you include research tips. After the brainstorming session, organize your notes based on the physical locations they refer to within the library. Then, you can begin writing the script that will be used to record the narration.
The script should reflect how the VT will move through the building. Don’t bounce around to different locations, because that will confuse new patrons. Put yourself in their shoes and create a script that moves logically through the library. After you have drafted it, circulate the script among your team for feedback. It should be concise and easy to understand. The script is your foundation, so make sure it’s solid.
Storyboarding — Storyboards are an essential component of video production, because the process forces you to consider every detail of your project. You can create a storyboard with words or pictures. The format of the storyboard is not important as long as you visualize every shot you want in your project. I chose to storyboard with words, and I chose to include it within the script.
The storyboard should include details that most people would consider incredibly boring. That’s part of its purpose. Walk around your library and make notes about the shots you want included in the VT. Stand where you envision setting up the camcorder and move your head as you plan to move the camcorder. What do you see that you want to include or remove from the shot? Write it down.
Consider the lighting, unwanted reflections, the season, background noise, and even the placement of trash cans. If your library has many windows, make sure you shoot during the day when the weather is calm and clear. You can shoot in the evening or during inclement weather, but keep in mind that continuity will be more difficult to achieve. The VT should look as if it was made during a brief period of time.
Do you want the library to be open or closed when you shoot the video? If you want the library to be open, get permission from anyone who appears in the video (including staffers). If people are included in your VT, it will be more challenging to shoot and edit, but it will also give it a more realistic feel. I chose to shoot mine while the library was closed because I wanted it to look computer-simulated, almost like a video game. If you shoot while the library is closed, be sure to turn on all the lights and even the computers. You want patrons to get a sense of what the library is like when it is open.
Production: Actually Taping Your Project
Video equipment —Any modern camcorder will be suitable for this type of project as long as you shoot with good lighting. How camcorders perform in low-light environments is one of the biggest indicators of cost. Usually, the better the low-light performance, the higher the cost. If you have a marketing or IT department, check with staffers about A/V equipment they have before you make a purchase or reach for your iPhone. I used a Canon camera (EOS Rebel T3i) set to record video at 1920x1080 (image size) with 30fps (frames per second).
Audio equipment —Use an external microphone connected to a computer running Audacity (free audio software) to record the narration. You can download Audacity from CNET. Choose a quiet location to record the narration portion of the VT. Consider noise from patrons, AC/heat vents, and outside traffic. All of that will show up in the background. Record the narration with energy. Pay attention to tone, pace, and enunciation. Your tone should be friendly and light, and the pace should match the camcorder movements of the VT. Listen to the narration recording with high-quality headphones to confirm that there are no unwanted noises hidden in the recording.
Postproduction: Putting It All Together
Editing software — You don’t need sophisticated editing software to create a great VT. If you have a PC running Windows, you can use Movie Maker. If you have a Mac, use iMovie. I used Sony’s Movie Studio 13 simply because I am comfortable with it, and I already owned it. No matter which program you use, make sure it can edit video files with the same properties as you set your equipment to. In other words, if you set your camcorder to 1080p/30fps, make sure your editing program can handle files with those properties.
Music — To add a professional element to your VT and engage viewers, incorporate music. Think about what effect you want the music to have. Do you want it to be relaxing or peppy? Modern or classical? Don’t choose music with lyrics, because it will distract viewers and detract from the narration. No matter the type of music you use, it should be royalty-free. You can purchase royalty-free music from Amazon, but consider using original music from patrons or library staffers. If you work in an academic library, contact the music department to see if there is student-created music you can use. This will promote the work of your students and draw more viewers to the VT. If you work in a public library, check with staff members and patrons to see if any of them would like to include their original work.
Editing — Cut it down. Don’t let it get too long. My goal was to make a VT that was no longer than 90 seconds. However, my first edit was 106 seconds. I tried trimming frames from the project, but that had a negative effect on the timing of the cuts. I finally decided to reevaluate the content. In the conclusion section of the VT, I realized I had drifted into talking about circulation services. It’s important for patrons to have that information, but it doesn’t need to be in the VT. I also had several establishing shots at the beginning of the video, which I was able to remove without affecting the overall aesthetic of the VT. Also, my first edit had titles before each segment such as “Main Level” and “Upper Level,” but I removed them to save time and avoid redundancy. So if your VT is too long, revisit the content as well as the editing choices you have made. If you do add text graphics, make them large. Most patrons will likely watch the VT on a small screen (phone or mini-tablet), and you want them to be able to read the titles easily. If you decide not to add titles or captions, keep in mind that patrons with hearing impairments will have more difficulty following your VT.
Hosting, Backup, and Storage: Planning for the Future
Master copies — Once you have edited the video and added the narration, export (or render) the video before adding titles, music, and special effects. This file will be the master copy, and you can use it to make changes to the VT in the future as the library’s spaces and services change. The first time I made a VT, I mistakenly exported only the polished version. Later, when I needed to update it, I realized that I couldn’t make any changes to the narration because the narration track had been fused with the music track when I had previously exported it. So I would have had to line up the music file exactly with the previous one, remove a section of the audio, re-record the narration, and tweak it until I couldn’t hear any inconsistencies. In other words, I created a lot of work for myself that could have been easily avoided if I had just created a master file. After creating the master file, label it and put it in a safe place. Next, add all the whistles and bells to your VT, render it, and label that file as your “working” version.
Hosting your VT — So your video is awesome, but how do you get it on the library’s homepage? I uploaded my VT to the library’s YouTube channel, copied the embed code, and inserted it into the library’s homepage HTML. Even though the file is stored or hosted on YouTube’s server, patrons can access it directly from the library’s homepage. Another benefit of using YouTube is that it tracks the number of views and allows for user comments, making it more interactive. If you prefer not to use YouTube, work with your IT department to host the video internally and ask the staff to create an embed code or provide a link that can be inserted into the homepage HTML.
Conclusions
Even if you regularly give well-attended library tours, it doesn’t hurt to have a virtual option. Patrons can then tour your library at their own pace and convenience. Your VT will be posted for prospective and current students, the public, parents of students, administrators, and potentially the world to see. So give yourself plenty of time to make it as flawless as possible. Once the VT is live and posted on your library’s homepage, be sure to draw attention to it. Send emails to relevant parties (administrators, patrons, and faculty members, etc.), mention it during library instruction, and advertise it on digital and physical signage. If you’d like to view the VT I made, visit lagrange.edu/library.
|
VIRTUAL-TOUR SCRIPT and STORYBOARD |
 |
 |
 |
OPENING SEQUENCE (INT)
Various shots of the library accompanied by music: pan over lobby; steady shots of sculpture, staircase, and hanging lights; no narration |
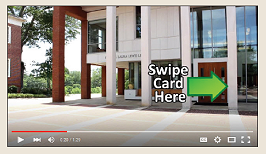
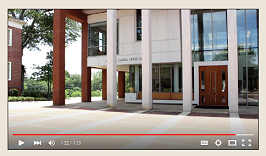
BUILDING FRONT (EXT)
Close-up of sign; steady shot of front of building
Narration: Welcome to LaGrange College’s Lewis Library. This brief, virtual tour will help you navigate the building and resources of the library. You can access the building after hours by swiping your student ID card here. |
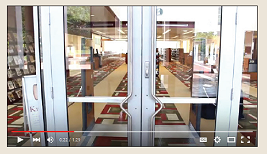
VESTIBULE (INT)
Steady shot on main doors; pan to the 24-hour-study entrance
Narration: The 24-hour study is located to the right of the library’s main entrance. |
 |
 |
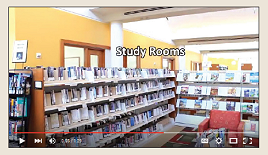 |
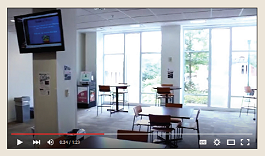
24-HOUR STUDY (INT)
Slow pan (left to right) of the 24-hour study
Narration: The 24-hour study contains a cafe, the tutoring center, study rooms, computers, and a printing kiosk. |
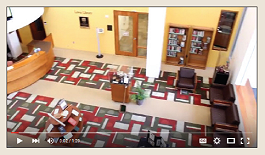
MAIN LEVEL (INT)
Panning shot: Highlight magazines, scanner, printing kiosk, reference desk, reference books, computers, circulation desk, and popular books.
Narration: The main level contains popular magazines, a color scanner with multiple file-delivery options, a printing kiosk, the reference desk, reference books, computers, the circulation desk, and popular fiction and nonfiction books. |
UPPER LEVEL (INT)
Panning shot: Highlight media lounge, DVDs and CDs, group study rooms, books, magazines, PCs, and the scanner.
Narration: The upper level contains a media lounge; the DVD and CD collection; group study rooms; books about art, photography, music, education, and travel; a variety of magazines, computers, and another scanner. |
 |
 |
 |
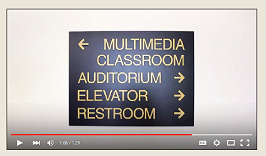
UPPER LEVEL/SIGN (INT)
Steady shot of the direction sign, then pan to auditorium
Narration: The multimedia classroom and auditorium are also located on this level.
|
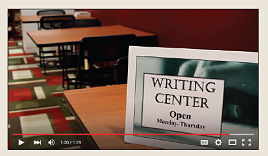
LOWER LEVEL (INT)
Steady shots of stacks, study areas, computers, and the writing center
Narration: The lower level contains the majority of the library’s physical book collection, as well as quiet study areas, computers, and the writing center. |
CLOSING (EXT)
Steady shot of front of building
Narration: We hope you take advantage of all your library has to offer, and remember to ask a librarian if you have any questions. |
|

