FEATURE
Tips and Tools for Digitizing a Museum Collection
by
Regina L. Avila, Susan Sanders, and Keith Martin
Imagine working at a large federal agency whose scientific research history stretches back more than 100 years. Imagine rooms full of fascinating scientific gadgets that illustrate the agency’s work—some in pretty display cases, some locked away in storage for decades. Now imagine what a group of information professionals sees when they look at a century’s worth of these scientific instruments hidden from the world because very few of them are available in cyberspace. What do those info pros want to do? What does any wired science geek want them to do? Digitize those resources and put them out on the web for everyone to see.
This scenario played out at the research library of NIST, the National Institute of Standards and Technology in Gaithersburg, Md. The library realized a long-term goal to share NIST’s rich research history online by creating a digital photo collection of all the museum artifacts.
NIST and the ISO … Who we are
The NIST is a nonregulatory agency within the U.S. Department of Commerce that employs scientists, engineers, and administrative personnel whose aim is perfecting the techniques of measurement science (metrology). The work at NIST results in research that is needed and used by other government agencies, private industry, and academia.
The NIST library is known as the Information Services Office (ISO) and comprises three primary programs: 1) the Research Library Information Program, the most recognizable part of the library, which includes research services such as reference help, impact studies, and packaging and delivering of targeted analysis to NIST scientists; 2) the Electronic Information and Publications Program, which is in charge of publishing the Journal of Research of the National Institute of Standards and Technology and other NIST papers; and 3) the NIST Museum and History Program. As part of the Museum and History program, ISO maintains a physical museum that showcases many of the agency’s scientific achievements. The museum owns approximately 1,000 physical scientific instruments and historic artifacts—some are on display, but others are in storage and out of view.
RELOCATION SPURRED DIGITIZATION
In mid-2010, the library began a project of relocating these items from a distant storage facility to a secure space within the library. This move gave us the opportunity to photograph the artifacts as they were being transported to the new storage, allowing us to attain our goal of digitizing the collection. With each photograph, we created a digital surrogate of each artifact, that is, a digital substitute that could be shared online, as well as a high-quality digital object that could be preserved in a digital archive.
To complete this project, ISO assembled a team and devised a workflow to create the digital photos, store them on a secure file server, and display them in a web-based digital repository that is publicly accessible online.
Staging and successfully executing such a large museum photography project was a hefty undertaking. As with any project, thorough planning was necessary—including assigning staff, selecting equipment, finding a workspace, and designing a workflow. What follows is a description of how we tackled this job and some lessons learned along the way.
Ready … Planning the scope of the project
The plan was to photograph the museum artifacts that were in the library’s physical museum exhibits and the objects in storage at a NIST building across campus.
The stored objects were moved in stages to newly installed wire mesh cages in the library’s basement over the course of the project. As items were relocated to the new storage, they were photographed, and records were modified and added into the museum’s database. The goal was to complete the project within 4 to 6 months.
Aim … Setting up the workspace and participants
The project team included four librarians:
• First was a research librarian who serves as custodian of the museum objects and was in charge of planning and executing the moving process and helping research and write artifact descriptions.
• A second librarian was charged with measuring the objects and entering descriptive information about them into the museum’s database.
• A digital services librarian oversaw the management and archiving of digital images once they were created.
• A fourth librarian assisted in the photography process along with the other librarians.
Each team member took turns assisting the photographer in staging the objects for the shoot, helping construct and arrange the items as needed, and assisting with the selection of close-up shots when appropriate. As team members accomplished their tasks, they shared their progress and any problems with one another. Although this team didn’t have a formal leader, the research librarian and digital services librarian moved things along and addressed issues as they arose.
PHOTOGRAPHY
We initially considered the photo project as a do-it-yourself endeavor. The library owns a high-quality digital camera and employs staff with intermediate photography experience. However, the team decided to seek professional advice on how to create the best images possible.
We consulted four professional photographers—three staff photographers with the federal government and a staff photographer from a university. These consultations resulted in a list of specifications for camera equipment and settings intended to guide us as we took the photos. As we reviewed the list, we realized that some of the recommended equipment was rather specialized. This raised concerns about how we would set the camera and lighting for optimal results. With that in mind, we considered hiring a professional photographer.
Research on the American Society of Media Photo graphers’ (ASMP) website offered information about finding a photographer (http://asmp.org/find-a-photographer) and what to expect for pricing (http://asmp.org/links/32). Ultimately, the team chose to have the photography completed by an NIST staff photographer who charged a reasonable rate that fit within our budget. The photographer was able to commit to shooting 2 days a week for several months. Ultimately, this was the right decision for this project. Since these images were intended to be a permanent archival record of the artifact, it was important to get the best photos possible from the start. We decided that hiring a professional photographer for the work would be money well spent.
The workspace
The NIST staff photographer usually works out of a large studio on campus. This is where all of the oversized artifacts ended up being photographed. This studio is also used for the photographer’s other assignments and therefore couldnot be devoted exclusively to our project. Since we needed a secure area where museum artifacts could be left overnight, as well as space for ancillary supplies and equipment, we looked for another space.
The library archives room became our makeshift studio. The room is secured with a coded lock and has adequate space for equipment, two to three project staff, and a staging area for assembly and disassembly of objects.
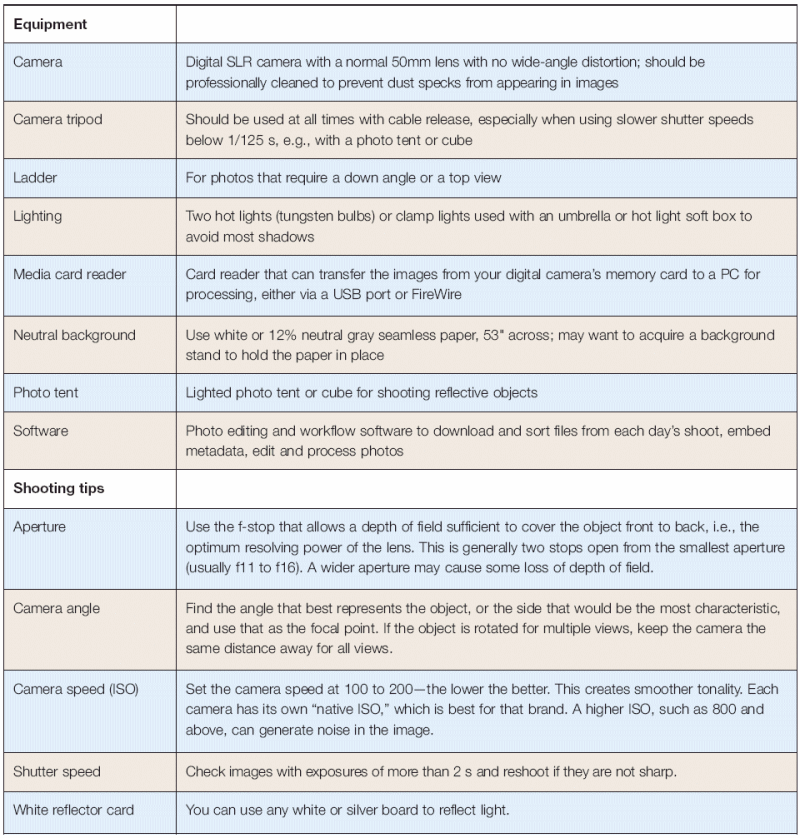
The equipment
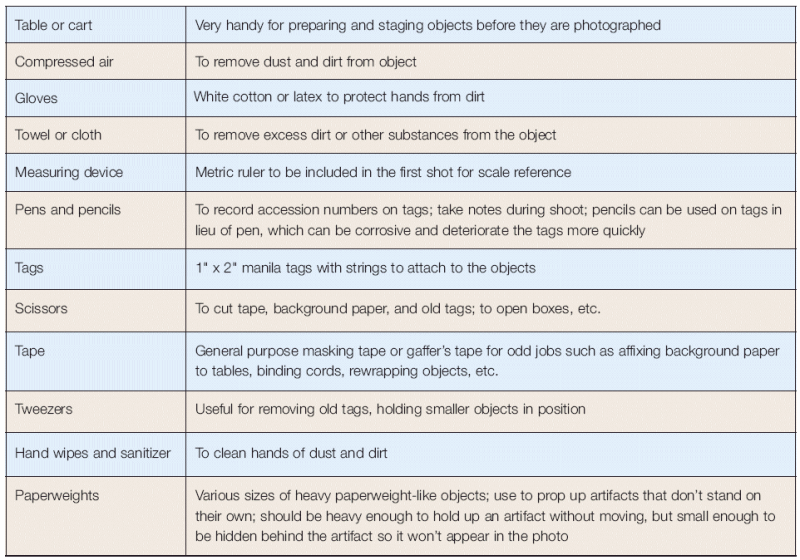
In addition to the photographic equipment, we needed a few other key things—a table covered with backdrop paper, a cart or table for preparing artifacts, and another cart for storing tools. The table is where the items were placed for the photos. The first cart was used to assemble items, if needed, and was used to move heavy items to the table. The second cart was kept close at hand and provided easy access to several tools necessary for staging each of the items. Tools included pencils, tags and strings, a ruler, and other materials.
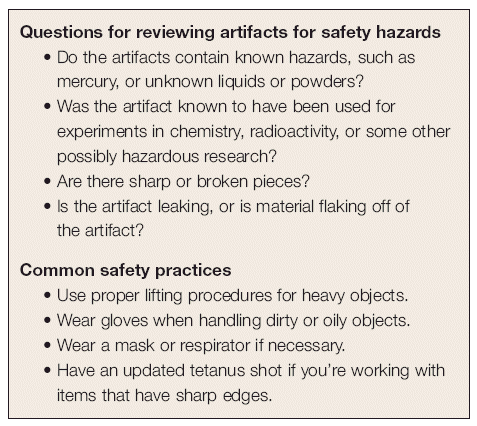
Safety first
The health and safety of the team was a primary consideration for this project. Since NIST was founded in 1901, the collection included a number of scientific instruments that had been manufactured in the early 20th century, before modern safety standards were adopted. Since the majority of the artifacts had been in storage for decades, they needed to be inspected for possible safety hazards. For example, some of the artifacts had been used for chemical and radioactivity measurement and could still be contaminated. Fortunately, NIST has safety specialists on staff who were willing to review the artifacts for potential dangers prior to the start of the photography project.
Of course, not all organizations have access to safety personnel. You may want to look around your institution for other sources of assistance. For example, at academic institutions faculty or staff in the physics or chemistry departments have likely received training in laboratory safety. They may be able to help identify hazardous materials and know how to handle them. Additionally, scientific staff may be interested in the historical value of the items, so they may be receptive to the idea of taking a closer look at them. Seeking out this assistance also had the added benefit of promoting and building interest in the digitization project and helped our team identify subject area experts who could help with artifact descriptions.
Shoot! … Establish and follow a good workflow
Photo sessions were scheduled for twice a week, 8 hours a day. The research librarian in charge of artifacts ensured that there were enough museum objects in the workspace to photograph for each day’s shoot. Team members who were assisting the photographer would notify the research librarian when they were running out of items to shoot. Depending on the size, complexity, and condition of the objects, the team was able to photograph anywhere from 10 to 50 objects each day.
As they arrived, each new object was measured, tagged with an accession number, and updated in the museum database. A team member assisted the photographer by taking objects off of the cart and positioning them. Objects were first photographed with the identifying tag and a ruler for scale. Afterward, the ruler and tag were removed. Multiple photos were taken with different views of the object or close-ups as necessary.
Shooting multiple views
Some of the artifacts were fairly simple and required only one or two views. However, others were photographed from several angles in order to capture specific details, such as numbers on dials or any intricate designs. Photos were taken of inscriptions and labels in order to record as much historical information as possible.
It was helpful to have multiple views, particularly in cases where the proper orientation of the artifact was uncertain. We didn’t always have historical information about the objects at the time they were photographed. In some cases, we were unable to tell if they were positioned correctly for the photo. If and when the correct orientation was established, we could find the right angle in one of the multiple photos, rather than reshoot the item. In some cases, the image could simply be digitally flipped, but there were instances when this easy fix wouldn’t have corrected the problem, and the extra photos came in handy.
Related items such as letters written by the artifact’s donors or instructions from the manufacturer were digitized as well. These items were either photographed or scanned on a high-quality flatbed scanner. The accompanying images or scans were later numbered to collocate with the photographs. All images were reviewed after each session to determine if any reshoots were necessary.
Negotiating hurdles
It is vital to be flexible when proceeding with such a multifaceted endeavor. At the beginning of the project, many of the tools recommended in Table 2 weren’t on hand, but they were co-opted as the process was developed. For example, early in the project the team noticed that objects with reflective surfaces, such as glass or metal, tended to become a mirror for their surroundings. To address this issue, a lighted photo tent was added to the toolkit to minimize the distracting reflections visible on these items. The workflow was altered to cluster these items on certain days when the photo tent was assembled, the lights were repositioned, and the camera settings were adjusted.
A change in staff was another hitch in the process. As team members changed, we paused for training and schedule adjustments. The workflow we had established helped smooth the transition as one person was trained to pick up where another left off.
Post processing
The photographer captured all images in camera raw format. The digital services librarian kept these original raw files and converted them from the digital cameras’ proprietary formats to .DNG files (digital negative, an open format for digital raw images).
The photographer cropped and edited the images and created JPEG files that would later be used for display in the online repository. These images, along with the original raw and .DNG files, were renamed, embedded with usage rights metadata, and placed into dark storage. Conversion to other preservation formats such as TIFF or JPEG 2000 may be considered at a later date. It is important to consider file size of whatever format you choose, as this will affect the amount of server space that you dedicate to dark storage.
Updates to the descriptive metadata are ongoing. As more information about the objects is discovered, particularly for objects for which there is little information, the team continues to add historical information to the database and online repository.
That’s a wrap
This project was completed within our 6-month deadline. As the artifacts were photographed, they were inventoried and either returned to the museum’s exhibits or placed into new secure storage. The digital files we created were secured in dark storage and made available to the public at the NIST Digital Archives (www.nist.gov/digitalarchives).
Although the photography has been completed, sharing these objects and enhancing their descriptions is an ongoing process. As previously mentioned, some of the items lacked historical information. The online archives allowed us to launch a crowdsourcing effort to ask for help in identifying these artifacts. The resulting press coverage has greatly increased the exposure of our organization, the digital archives, and the collection.
Lessons learned
It is important to plan ahead and prepare as much as possible. Survey your objects beforehand to determine the best order for photographing them. Group similarly sized artifacts together to create a more efficient workflow. This way the photographer wonhave to change or adjust lenses, lighting, or shooting positions as often. Reflective objects should be photographed together for the same reasons. Also, consider the weight of the items. If they are heavy, make sure to schedule staff who can handle moving them. If objects are dusty, plan some time to clean them beforehand to avoid rushing during the photo sessions.
It is also critically important to make sure all objects are tagged and accessioned before they are photographed. When photographing a large number of items, it is very difficult to identify them in the photos after they are photographed and put away. It is just as important to review all images immediately after each day’s shoot. This practical step allows the flexibility to reshoot objects before they leave your studio. In addition, be sure to update your objects’ database as you go. Catching up on a backlog of data entry is difficult to do after the fact.
Assemble a team that is dedicated to the task. Appoint a team leader who oversees the workflow, sets the work schedule, and tracks milestones. Make sure team members keep each other informed of progress or bumps in the road.
Finally, be flexible. There will undoubtedly be unexpected problems, but an organized team that has a familiarity with the scope of the task will help in dealing with surprises. It is useful to work from a checklist that delineates each step of the process. This will keep you efficient, effective, and focused on the outcome.
|